For most brands and businesses, Instagram shopping posts are an excellent way to showcase products and services to followers.
Because of the platform’s new check-out feature, you can now purchase products directly without having to leave the app. How cool is that?
Now, it’s more convenient to introduce and educate your followers about your products through shopping posts. Furthermore, you can also guide your followers to buy something with just a few clicks.
Read on to learn more about how you can drive more sales through Instagram shopping posts.
What’s a Shoppable Post?
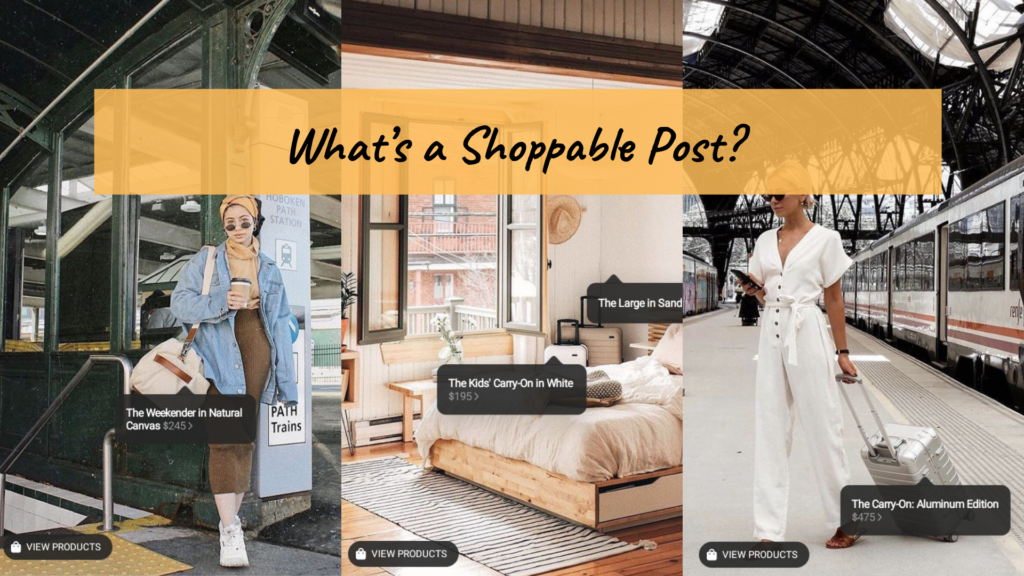
Shoppable Posts have a white bag icon in the bottom left corner of the post.
There are times where this icon goes with the ‘Tap to view products’ text.
What usually happens when a user taps this icon is that square shaped pop-ups are shown. These pop-ups display the product name and other details, such as the pricing.
When a user clicks on this pop-up, another page opens where a bigger image of the product is displayed with additional details.
Moreover, the ‘Shop Now’ option is also shown. When users click on this, they’re redirected to your website where they can purchase the product directly.
Before, if you wanted people to buy from your site, you needed to place your link on your bio. Then, you had to tell people to go there and click on it to purchase something.
But now, Shoppable Posts make it convenient for users to visit your site. It’s now also relatively easy for users to purchase products, which help increase sales.
Six Steps to Get Started with IG Shoppable Posts
1. Convert to a Business Account
Let’s get into it. Before anything else, you need to have a Business Account on Instagram. At this point, it’s essential that you make a conversion.
If you don’t convert your Instagram to Business, then you’re also missing out on what Instagram Analytics has to offer to help you grow your account.
Moreover, you’re also missing out on a huge opportunity to make your Instagram shoppable.
So, if you still haven’t switched to a business account yet, now is the time.
2. Be in the right country
After switching your account to Business, you need to make sure that you’re in a country that’s eligible for shoppable posts.
When this feature first came out, it was only initially available to nine countries. But now, it has expanded to 46 countries with the plan of going global. To know whether your country is eligible or not, see this post from Instagram.
3. Update the app
Before you proceed, ensure that you have the latest version of the app on your phone.
4. Sell your stuff!
The next thing that you need to do is to ensure that you’re selling physical goods that comply with IG’s merchant agreement and commerce policies. You can sell anything like clothing, art, and so on, as long as it’s tangible.
5. Create a product catalog on Facebook
To proceed, connect your IG business profile to a Facebook catalog. In its most basic form, a Facebook catalog is a list of all the products that you want to sell.
You can set it up either through Shopify, BigCommerce, Facebook Business Manager, or a Facebook Page.
The easiest option of setting up your product catalog is through your Facebook Page.
First, you need to enable the shop section on your Facebook Business Page. See to it that you’re using the correct template.
Click on Settings, go to Edit Page, then Template. Choose the Shopping Template. Then, you’ll come across the Apply Template button.
Once you’re using the Shopping Template, the “Shop” tab will appear on the main page. Click on that tab, and you’ll view your shop!
Initially, it will be empty, but you can start adding products later on to fill it. You can also add or remove any products there as well.
Note, however, that before you can start adding anything, you need to set up the payment process first. Specify how prospective customers will check out, what kind of currency you’ll accept, and so on.
If you have never done this before, a pop-up window will appear automatically. You need to fill in a form first and agree with the terms and conditions.
Once you’re done, you will be able to add products in your catalog. All you need to do is click on “Add Product” in the shop.
The entire process is pretty simple. You can place images and videos, enter the product description, set a price, then place a link on the page where users can check-out.
An important note: If you’re having a sale, you can place a discount on the product by clicking on the slider, and set a new price. You can always come back and edit the costs once the sale is over!
Lastly, always make sure that your products are in stock. If they’re not, you might need to edit it on Facebook Business Manager.
6. Wait to be approved
After you’re done with the steps above, wait for your account to be approved. Your account needs to be reviewed by Instagram first before you can access the shoppable feature entirely.
The process usually takes anywhere between a few hours to days, so be patient.
You’ll know that you are approved if you receive a notification on your Instagram profile. After receiving that notification, you have to make a couple of finishing touches.
Head directly to Instagram Settings, then Business Settings, and click on Shopping to continue.
From there, you’ll see a catalog listed, just like what you saw on Facebook. Click on that catalog.
And voila! You’re done. It’s now possible to tag your Instagram posts with your products.
How to Tag Products with Instagram Shoppable Posts
After gaining access to Shoppable Posts on Instagram, adding tags to your posts is pretty straightforward.
Begin by adding a photo just like what you would do on any other post. After you’re through with your effects and filters, hit “Next.”
If you already have the product feature activated in your account, you’ll see the option to tag your products where you would usually put captions and other info.
Afterward, place the names of the specific products that you want to tag.
Then, click on them when they appear on the search box.
Once everything is through, click “Done” to publish your post.
Here’s a tip ‒ you can tag products on both your new and current posts. It’s even possible for you to tag up to five products on a single image (or 20 products in a carousel post).
Over to You
The introduction of Instagram Shoppable Posts has made a significant impact on most brands and businesses. It might be a pain to set up, but all the effort is worth it in the end.
Because of this feature, users can purchase products without having to leave the app. Just follow the steps that we have discussed, and you will be able to generate more sales.

